Halloween Ghost Lantern Garland

http://www.shelterness.com/15-cool-diy-halloween-lanterns-and-luminaries/pictures/12009/

http://www.networkpanda.com/ngis/2012/08/diy-halloween-decorations/
Halloween Ribbon Wreath
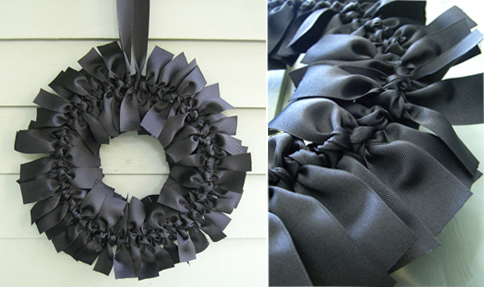
http://www.casasugar.com/DIY-Halloween-Ribbon-Wreath-2353651
Wine Bottle Jack - O - Lanterns


Step 2: Ditch those label
Soak the bottles in a bucket of water for a little while and then peel and scrape off the soggy mess. This only took about 10-15 minutes.
The Goo Gone is for wine bottles that have particularly sticky labels that are hard to remove.

Step 3: Tape it up


Step 4: Draw faces!


http://www.networkpanda.com/ngis/2012/08/diy-halloween-decorations/
Halloween Ribbon Wreath
http://www.casasugar.com/DIY-Halloween-Ribbon-Wreath-2353651
Wine Bottle Jack - O - Lanterns
Step 1: Materials
Wine Botlles, Masking Tape, Sharpie, X-acto Knife, Spray Paint (Orange and green), Bucket
Wine Botlles, Masking Tape, Sharpie, X-acto Knife, Spray Paint (Orange and green), Bucket
The Goo Gone is for wine bottles that have particularly sticky labels that are hard to remove.
Step 2: Ditch those label
Soak the bottles in a bucket of water for a little while and then peel and scrape off the soggy mess. This only took about 10-15 minutes.
The Goo Gone is for wine bottles that have particularly sticky labels that are hard to remove.
Step 3: Tape it up
Break out
the masking tape! Put a large working are on the front of the bottle. The
"front" here being the side facing you when the seams of the bottle
are pointing to the side.
Also wrap a
bit of tape around the top of the bottle to avoid painting the cork and lip of
the bottle.
Step 4: Draw faces!
Use the
Sharpie to draw some Halloween faces on the bottles.
Step 5: Cut
and peel
Use the
X-acto to cut the edges of the faces you just drew. Make sure to get all the
way around. Then just peel away everything else, being careful not to go too
fast. You may have missed a spot and don't want to go back.
If you do
mess up and tear the tape, you can patch it with a bit more masking tape.
That's what happened to the happy face on the right.
Step 6:
Paint the stems
Break out
the green spraypaint and spray the necks of the bottles. Wait a while, at least
a day, before applying some masking tape over these to protect them for the
next stage. Do it too early and the tape will pull off some of the paint when
it's removed.Step 7: Paint the bodies
Use the orange spraypaint and apply a series of light coats with 20 minutes in between to let each coat dry.
Once you're done, let the bottles dry for at least an hour before removing any of the tape.
Once you're done, let the bottles dry for at least an hour before removing any of the tape.
Step 8: Peel off and enjoy!
Slowly remove all of the tape and you have some wine bottle jack-o-lanterns! While these bottles are dry to the touch they may still be a little tacky and smell like spraypaint. Let them fully dry for a few days, or even a week, before putting them out or giving them to someone else. No one likes a smelly present.


